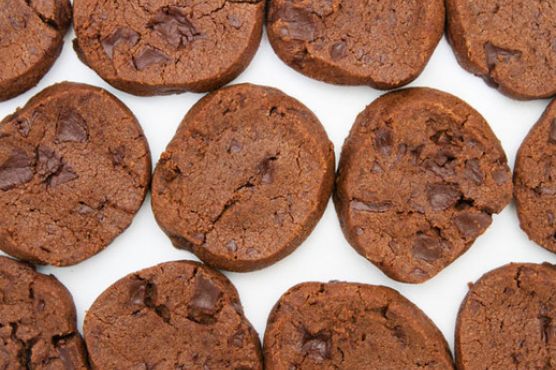
World Peace/Korova Cookies
You can never have too many hor d'oeuvre recipes, so give World Peace/Korova Cookies a try. This recipe serves 36. One portion of this dish contains about 1g of protein, 4g of fat, and a total of 84 calories. For 16 cents per serving, this recipe covers 2% of your daily requirements of vitamins and minerals. A mixture of baking soda, butter, fleur de sel, and a handful of other ingredients are all it takes to make this recipe so yummy. It is brought to you by Serious Eats. 12 people have tried and liked this recipe. From preparation to the plate, this recipe takes around 45 minutes. With a spoonacular score of 4%, this dish is very bad (but still fixable). Try World Peace/korova Cookies, World Peace Cookies, and World Peace Cookies for similar recipes.
Servings: 36
Ingredients:
1/2 teaspoon baking soda
1 stick plus 3 tablespoons unsalted butter, at room temperature
5 ounces bittersweet chocolate, chopped into chips, or a generous 3/4 cup store-bought mini chocolate chips
1/2 teaspoon fleur de sel or 1/4 teaspoon fine sea salt
1 1/4 cups all-purpose flour
2/3 cup (packed) light brown sugar
1/4 cup sugar
1/3 cup unsweetened cocoa powder
1 teaspoon vanilla extract
Equipment:
stand mixer
hand mixer
bowl
kitchen towels
plastic wrap
baking sheet
oven
knife
wire rack
Cooking instruction summary:
Procedures 1 Sift the flour, cocoa and baking soda together. 2 Working with a stand mixer, preferably fitted with a paddle attachment, or with a hand mixer in a large bowl, beat the butter on medium speed until soft and creamy. Add both sugars, the salt and vanilla extract and beat for 2 minutes more. 3 Turn off the mixer. Pour in the flour mixture, drape a kitchen towel over the stand mixer to protect yourself and your kitchen from flying flour and pulse the mixer at low speed about 5 times, a second or two each time. Take a peek—if there is still a lot of flour on the surface of the dough, pulse a couple of times more; if not, remove the towel. Continuing at low speed, mix for about 30 seconds more, just until the flour disappears into the dough—for the best texture, work the dough as little as possible once the flour is added, and don’t be concerned if the dough looks a little crumbly. Toss in the chocolate pieces and mix only to incorporate. 4 Turn the dough out onto a work surface, gather it together and divide it in half. Working with one half at a time, shape the dough into logs that are 1 1/2 inches in diameter. Wrap the logs in plastic wrap and refrigerate them for at least 3 hours. (The dough can be refrigerated for up to 3 days or frozen for up to 2 months. If you’ve frozen the dough, you needn’t defrost it before baking — just slice the logs into cookies and bake the cookies 1 minute longer.) 5 Center a rack in the oven and preheat the oven to 325°F. Line two baking sheets with parchment or silicone mats. 6 Working with a sharp thin knife, slice the logs into rounds that are 1/2 inch thick. (The rounds are likely to crack as you’re cutting them — don’t be concerned, just squeeze the bits back onto each cookie.) Arrange the rounds on the baking sheets, leaving about one inch between them. 7 Bake the cookies one sheet at a time for 12 minutes — they won’t look done, nor will they be firm, but that’s just the way they should be. Transfer the baking sheet to a cooling rack and let the cookies rest until they are only just warm, at which point you can serve them or let them reach room temperature.
Step by step:
1. Sift the flour, cocoa and baking soda together.
2. Working with a stand mixer, preferably fitted with a paddle attachment, or with a hand mixer in a large bowl, beat the butter on medium speed until soft and creamy.
3. Add both sugars, the salt and vanilla extract and beat for 2 minutes more.
4. Turn off the mixer.
5. Pour in the flour mixture, drape a kitchen towel over the stand mixer to protect yourself and your kitchen from flying flour and pulse the mixer at low speed about 5 times, a second or two each time. Take a peek—if there is still a lot of flour on the surface of the dough, pulse a couple of times more; if not, remove the towel. Continuing at low speed, mix for about 30 seconds more, just until the flour disappears into the dough—for the best texture, work the dough as little as possible once the flour is added, and don’t be concerned if the dough looks a little crumbly. Toss in the chocolate pieces and mix only to incorporate.
6. Turn the dough out onto a work surface, gather it together and divide it in half. Working with one half at a time, shape the dough into logs that are 1 1/2 inches in diameter. Wrap the logs in plastic wrap and refrigerate them for at least 3 hours. (The dough can be refrigerated for up to 3 days or frozen for up to 2 months. If you’ve frozen the dough, you needn’t defrost it before baking — just slice the logs into cookies and bake the cookies 1 minute longer.)
7. Center a rack in the oven and preheat the oven to 325°F. Line two baking sheets with parchment or silicone mats.
8. Working with a sharp thin knife, slice the logs into rounds that are 1/2 inch thick. (The rounds are likely to crack as you’re cutting them — don’t be concerned, just squeeze the bits back onto each cookie.) Arrange the rounds on the baking sheets, leaving about one inch between them.
9. Bake the cookies one sheet at a time for 12 minutes — they won’t look done, nor will they be firm, but that’s just the way they should be.
10. Transfer the baking sheet to a cooling rack and let the cookies rest until they are only just warm, at which point you can serve them or let them reach room temperature.
Nutrition Information:
covered percent of daily need
